| This post describes the finishing steps of the bra construction. In my pattern piece the shoulder strap is sewn at the edge at the back. Cut the back piece to match the hook/eye closure. |
 |
 |
| Cut the shoulder strap in two parts and stitch it to the back with a wide zigzag stitch. The edge of the strap is on the edge of the lycra. The strap is a bit overlapping at the end to cut it exactly straight later. |
 |
| The seam allowance is trimmed and the ring is put over it. |
 |
| Stitch the ring with a narrow, close zigzag stitch. Only then cut off the shoulder strap. This is so much easier to do than sewing with a short piece of strap. |
 |
 |
 |
| Cut the shoulder strap in the same line as the lycra. |
 |
| Attach the hook and eye, also with a zigzag stitch. |
 |
The remaining piece of shoulder strap is sewn to the slider |
 |
| This piece of strap is pulled though the ring from back to front. |
 |
| Then throught the slider |
 |
| Wires and boning are inserted and all ends are closed with a narrow zigzag stitch (center front, under the arm, underside of boning). |
 |
| The shoulder straps are sewn to the cups with a zigzag stitch. Try the most comfortable place before attaching. |
 |
 |
| My dressform is wider in this area than I am and I can’t close the bra on it. But you can see the back are getting shape while the pattern piece is almost straight. |
 |
| The last finishing touch is is of course the bow. |
 |
Showing posts with label balconet. Show all posts
Showing posts with label balconet. Show all posts
Saturday, June 22, 2013
Balconet bra - part 4: finishing

Balconet bra - part 3: inserting the cups
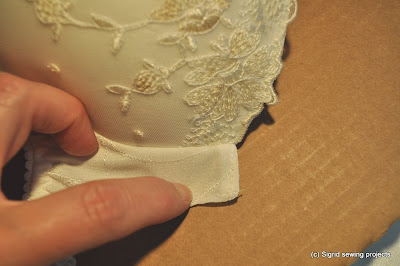
| The next step in constructing the bra is inserting the cups. Pin the cups into the band. In my pattern the cups have a seam allowance of 3.5 mm, the band 6 mm. That’s why I have the band extending the cup a bit. Easy to see when pinning, but of course you could work with the same seam allowances. Stitch the cup with a straight stitch just beside the zigzag stitch that holds the lace to the cup. |
 |
| Important is matching the center front point at both sides and at the side seam. |
 |
 |
| The cups are inserted. |
 |
 |
| Stitch the wire chanelling with a straight stitch to the cups. Match the wire channelling with the stitching of the cup. On this preformed cup I found it easy to without pinning first. |
 |
| On the outside the wire channelling is topstitched. This can be done once on the outer edge of the channelling only, or twice. Then an extra row is stitched very close to the cup. I always do it twice and have the feeling that it makes this area more flat after you’ve put the wire in. In this style it might not make that much of a difference Topstitch the outside line of the wire channelling for the boning too. |
 Next: part 4 - finishing |
Balconet bra - part 2, band construction
| This post describes the construction of the bra band. In this bra I’ve used boning at the side of the cups for extra stability. Therefor the pattern piece is divided in two pieces. The first photo is of the original pattern from Paula of Kantje Boord, the second photo is a mix from that pattern piece (the cup part) and the band I use for myself. For me this band is comfortable and does not ride up. When trying other patterns I mostly still use this band pattern. It has the “downward hike” which is good for me and though it looks very vertical, it has a nice curve when worn. |
 |
 |
| The photo below shows a piece of the wire chanelling, above and below are the seam allowances for inserting the cup and attaching the picot elastic. Under the cup there won’t be more than the width of the wire chanelling. The elastic will be sewn under the wire chanelling. |
 |
| Cut the band pieces. As I use lycra here the center front (bridge) can be cut on the fold. |
 |
| The center front part is interfaced with a non stretch tule. Stitch the tule on the right side of the lycra. |
 |
| Fold the tule to the wrong side of the lycra and topstitch. |
 |
| I use a long zigzag stitch to secure both layers. Stitch in the seam allowance. |
 |
| The lycra I’m using is too stretchy for me and I use a thin stretch tule as interfacing. This is also attached with a zigzag stitch. Whether this is necessary completely depends on your lycra and/or the amount of support you need. If you use a stable lycra, you will probably not need this (I don’t in that case, and I’m an E/F cup). |
 |
| Stitch the center front and side part together. For the boning stitch a piece of wire channelling very close to the seam but don’t stitch to the edge. Leave some room for turning the elastic. |
 |
 |
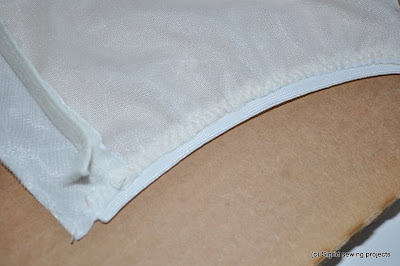
| Stitch picot elastic at the top and bottom of the band. The right side of the elastic is up and the picot side is on the side of the band. This is a photo of how I stitch the elastic: the lycra I keep at the 0,5 mm mark at the stitch plate, the elastic a bit to the right of it. The needle is in the left position and I use a small zigzag stitch (on my machine 2.5 width, 2.2 length). I pull the elastic a little, stitch, pull a litte, stitch just below the picot edge. Until recently I measured my elastic and pinned it. At a workshop at Kantje Boord I learned to do it like this, which is more efficient in sewing and no need to trim the seam allowances afterwards. So much quicker. |
 |
| At the cup side the seam allowance is kept free of elastic, to prevent bulk. |
 |
 |
| Fold the elastic to the wrong side and topstitch with a triple zigzag. At the top the elastic is folded over the wire chanelling for the boning. Less irritation under your arm when worn. Don’t topstitch the wire chanelling at the bottom! The boning still needs to be inserted.You could do that now, prior to topstitching the elastic, but I prefer to do it later to keep it all flexible till the last minute. |
 |
 |
| The band is fnished now |
 |
 |
| The next photo shows the wire channelling for the boning: at the top under the elastic, at the bottom it’s not closed yet. |
 Next part: part 3 – inserting the cups |
Wednesday, June 12, 2013
Balconet bra - preformed cups
This is the first post on making a balconet bra using pre-formed cups. I made a first bra in this way in a workshop at Kantje Boord (the famous lingerie notions shop in Amsterdam, Paula who gave the workshop did not mind my posting this). In this post I will describe the way the cup is covered with a stretch lace.
Just to give you an idea: this is my first bra with preformed cups:

For the bra in this and in following posts I used embroidered lace with a little bit of stretch. The basic color of the lace is the same as the cup, which makes there is no need for a separate layer under the lace for matching colors. That’s for another bra/post.
| Step 1 – The cup is cut from a preformed cup that was not intended for a balconet bra. Use a cup that you can find in your size. I’m not able to advise on this, as I’m only sewing for myself and occasionally my daughter. |
 |
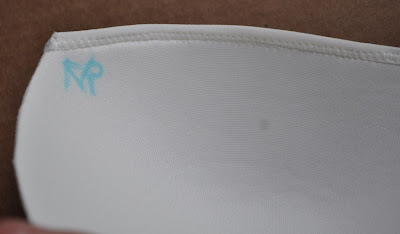
| Once cut the center front is not very obvious any more. Mark left/right and center front on the inside. I used a marker that will disappear with water |
  |
| Step 2 – The upper edge is covered with foldover elastic (foe). The photo is a bit blurry unforturenately . Start by pinning the beginning of the foe on the edge (only 1 pin) and have a little extra to start with. Sew the elastic with a zigzag stitch. I don’t like working with foe, but if you work slowly it’s not too bad. Work like this: stitch – stop – stitch –stop….. Everytime you stop you pull the elastic a little bit and fold it over the edge for a few centimeters. |
   |
| Step 3 – The cup is covered with lace. This is my pattern from the workshop. The upper edge is the the scallop side. |
 |
 |
| If possible (depending on the embroidery) try to have as less embroidery on the seam and especially not at the center point that I marked in the photo below. It makes a beautiful curve more difficult. |
 |
| Tp get a good mirrored image I use the first cup to cut the second cup. |
 |
| Step 4 – Stitch the seam and make sure the point is rounded. This helps the curve too. |
 |
| Step 5 – Pin the lace over the cup, starting at the top edge. Depending on the amount of stretch it can be that the lace will be a bit longer than the cup. That is no problem. Make sure there are no wrinkles. |
 |
| Step 6 – Stitch the upper edge with a zigzag stitch and do that with the rest of the cup too. I did the top edge from the outside, the rest from the inside. I changed the position of the pins for that. |
 |
| Step 7 – finishing: here you can see the lace extends over the cup. It is cut off. |
 |
 |
| The result : both cups covered. The edges have 3.5 mm seam allowance (in this pattern), which is about the width of the zigzag that is used to stitch the lace to the cup. |
 |
Subscribe to:
Posts (Atom)